Table of Contents
Automating Phasmophobia Part 1: The Menus #
The Why #
Phasmophobia is a PvE game where you play to acquire tools to play better and increase your difficulty to acquire better tools, in a loop.
This is fun, but the weaker items have downsides like a random chance to not operate. This presents a challenge to play around the weaknesses of the items, but for inexperienced players it can be frustrating. On multiple occasions we’ve left a book to test for scribbles and not seen it interacted with. After excluding ghost types with “ghost writing” traits and locking in our answer, the game tells us that it was a “ghost writing” type, we just either didn’t put the book within range or it didn’t work due to it being a lower-level item with weakened range and odds of working.
This is the why of this blogpost. My friends and I are bad at the game. Our philosphy is we should be playing with good, functioning items, and if we get better at the game then our items should get weaker with harder difficulties instead of the other way around.
So… how do we get the better equipment?
The Loop #
Equipment is unlocked using XP and in-game money earned from playing. The amount of XP and money you earn scales with the difficulty of the game – aggression, hunting speed, flashlight range, etc. The largest component of the rewards comes from correctly identifying the ghost. The odds of correctly identifying a ghost thus gets lower, as it’s more difficult to identify the ghost with these hurdles.
…Well, to a degree, yes. If we just load the game guess a random ghost and leave as quickly as possible, we will not get it correctly very often. By cranking the difficulty as high as possible, we get 15x multiplier on rewards for the about 1 in 20 chance we do get it correct!
This is the strategy. I’m a little lazy though, so while my friends were doing this with various shows queued up on their second monitors, I chose to automate instead.
Relevant XKCD: 1205 “Is It Worth the Time?” and 1319 “Automation”
(code collapsed)
# Collapsed: Skip this! It's just for the demo videos.
from contextlib import contextmanager
import tempfile
import base64
from threading import Thread
from IPython.display import HTML

@contextmanager
def display_recording(speed_factor=1):
    _, tmp = tempfile.mkstemp(suffix='.webp')
    with save_recording(tmp, speed_factor=speed_factor):
        yield
    b64 = base64.b64encode(open(tmp,'rb').read()).decode('ascii')
    b64_html = f'<img src="data:image/webp;base64,{b64}" />'
    # print(len(b64_html))
    ipydisplay.display(HTML(b64_html))

@contextmanager
def save_recording(out_path, speed_factor=1):
    w.activate()
    bbox = win32gui.GetWindowRect(hwnd)
    sig_continue = True
    buf = []

    def record_loop():
        while sig_continue:
            buf.append(ImageGrab.grab(bbox, all_screens=True))
            # Screen grabs are too slow to reliably rate.
            # time.sleep(1 / fps)

    t = Thread(target=record_loop)
    time_start = time.perf_counter()
    t.start()
    time.sleep(.5)
    try:
        yield
        time.sleep(3)
    finally:
        sig_continue = False
    t.join()
    time_end = time.perf_counter()

    buf[0].save(
        out_path,
        save_all=True,
        append_images=buf[1:],
        optimize=True,
        quality=5,
        duration=1000 * (time_end - time_start) / len(buf) / speed_factor,
        loop=0,
    )

with save_recording('../assets/phasmo_loop.webp'):
    time.sleep(15)
    while not images_same(
        fast_screenshot_window(),
        SINGLEPLAYER_LOBBY_SCREEN_NEED_MAP,
        SINGLEPLAYER_LOBBY_SCREEN_NEED_MAP_MASK):
        time.sleep(1)
Click to load recording demonstrating gameplay (about 3MB)
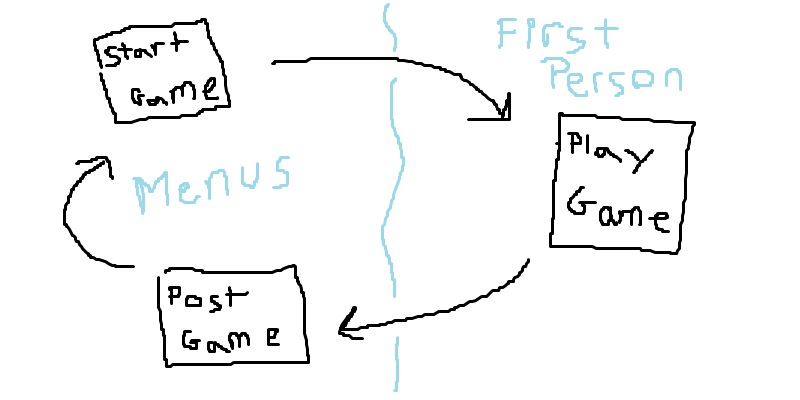
The Method #
There are two portions to automate – the menus and the first-person gameplay. This page will cover the strategy to automating menu navigation.
Navigating the menus requires injecting keyboard inputs and identifying the current screen.
Both can be accomplished with AutoHotKey, but I am more comfortable with Python and OpenCV than I am with AHK’s scripting language. For this reason, I’m using AHK but with a wrapper to interface with it through Python for injecting key presses.
To identify the current screen, we could:
- Look at the colors on strategically selected pixels
- Tough to debug, and brittle to any minor screen variations at the detection pixels
- Look at a strategically determined region of the screen and compare it to a reference image.
- Read system memory with CheatEngine or similar
- Perform OCR (Optical Character Recognition) to read the words on the screen
We will do approach #2. By choosing regions of the screens, we can compare the current screen against reference images based on the parts that don’t change (as our XP changes, etc). It also allows us to perform image manipulations to counteract minor variations to reduce flakiness.
OCR would also work pretty well and allow us to click based on word positions on the screen. Phasmophobia has pretty stylized text and buttons that are greyed out with only minor coloring differences, so our OCR model would have to be pretty robust and we would have to do image processing regardless.
# $ pip install opencv-python ahk pywin32 Pillow
import cv2
from ahk import AHK, Window
import IPython.display as ipydisplay
from PIL import Image, ImageGrab
import numpy as np
import time
import tempfile
import win32gui
try:
    ahk: AHK = AHK(executable_path=r'C:\Program Files\AutoHotkey\v1.1.37.01\AutoHotkeyU64.exe')
except:
    ahk: AHK = AHK(executable_path=r'C:\Program Files\AutoHotkey\AutoHotkeyU64.exe')

# Locate the game and acquire a window handle
w: Window = ahk.find_window_by_title('Phasmophobia') # type: ignore
hwnd = int(w._ahk_id, 16)
First things first – we need to grab screenshots of the game. Pillow has a built-in functionality to grab images from regions of the screen. That should work fine!
bbox = win32gui.GetWindowRect(hwnd)

def fast_screenshot_window():
    """
    Grabs a screenshot of the currently active window.
    Return as an opencv-compatible array.

    Note: ImageGrab doesn't work on your secondary monitor
    unless you do all_screens=True. Why isn't this the default?
    I have no idea.
    """
    img = ImageGrab.grab(bbox, all_screens=True)
    return np.array(img)

def show_image(img):
    from IPython.display import display
    display(Image.fromarray(img))
# Bring Phasmo into focus and take a screenshot.
w.activate()
screenshot = fast_screenshot_window()
print(screenshot.shape)
show_image(screenshot)
(639, 816, 3)
Classifying the menu screens has several nuances we will need to consider.
Luckily, Phasmophobia’s menus are almost entirely static. The screen doesn’t change much at rest, and we don’t have to worry about view bobbing or anything. The most we have to worry about is a few dust particles that move randomly across the screen and possibly some Steam notifications appearing in the corners. (Oh and also my fps counter that I’m too lazy to turn off)
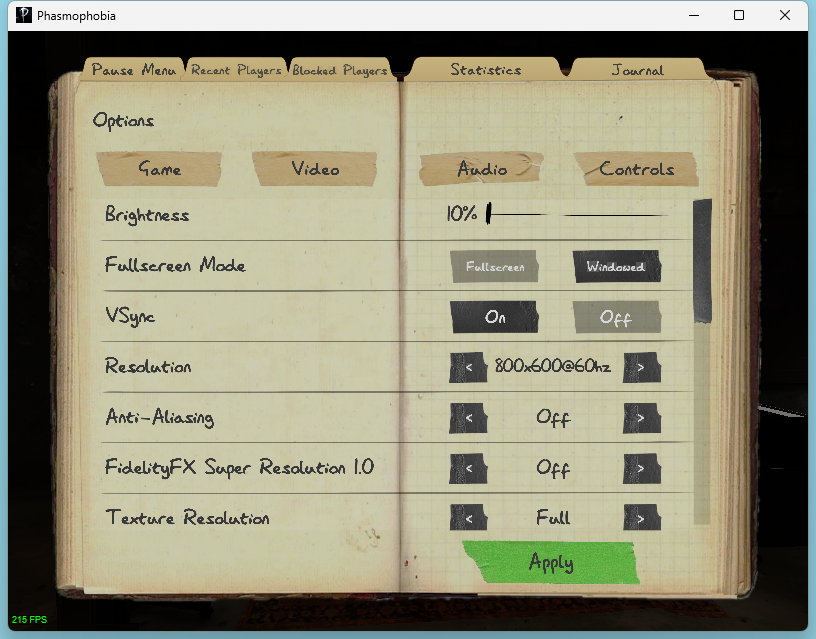
I’ve strategically decided to open the options screen to demo our first screenshot. This is to show my setup.
- Brightness doesn’t really matter, it just needs to be consistent and otherwise untouched.
- Running in Windowed mode means we get some extra border around the screenshots, but it’s easier to scale the game size.
- VSync may be helpful to ensure we are looking at consistent views of screens, not trying to process any images that are torn.
- Resolution I’ve set to 800x600 as it’s a pretty round number and reasonably small without being too cramped. A smaller screen will be lighter computation for the computer vision operations later.
- Anti-aliasing and super resolution are undesired – we want sharp, precise
edges.
- Some of these options might be different on your computer but you can figure it out.
- Texture resolution also doesn’t matter so long as we’re consistent.
In order to write logic about the contents of our screenshots, we’ll need to know the position of items in our images. The following function draws guidelines in increments of fifty pixels.
def debug_image(img):
    """Draws guidelines for pixel positions.

    Draws red lines on hundreds marks.
    Draws green lines on the fifties between them.

    Pixel positions start from the top-left corner, and go down from there.
    """
    img = img.copy()
    h, w, _ = img.shape
    RED = 0xff, 0x00, 0x00
    GREEN = 0x00, 0xff, 0x00
    for x in range(0, w, 100):
        cv2.line(img, (x, 0), (x, h), RED)
        cv2.line(img, (x + 50, 0), (x + 50, h), GREEN)
    for y in range(0, h, 100):
        cv2.line(img, (0, y), (w, y), RED)
        cv2.line(img, (0, y + 50), (w, y + 50), GREEN)
    return img

show_image(debug_image(fast_screenshot_window()))
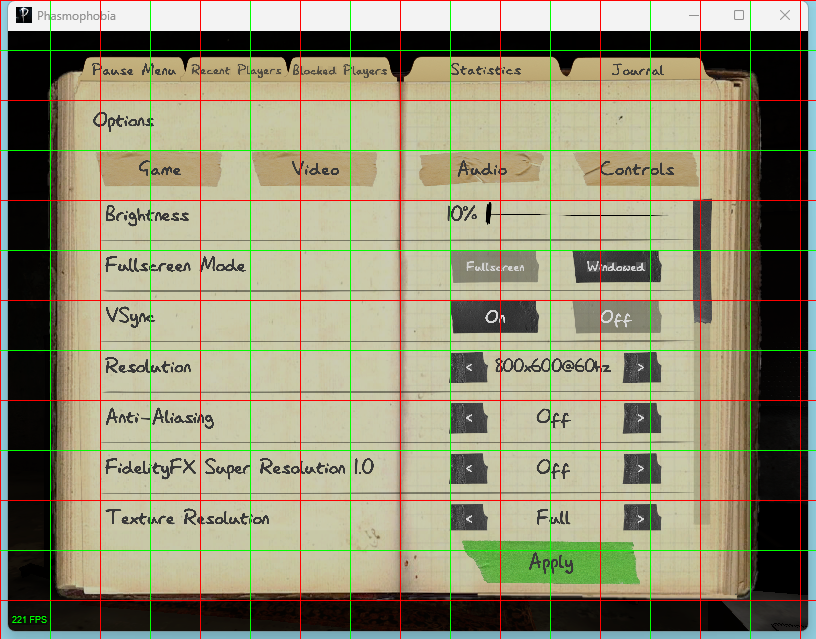
Now we have a nice way to reason about positions on the screen. When I wrote my initial version I used MSPaint to manually edit and save reference images to folders and precisely get image positions with the mouse location, but this guideline approach will be sufficient for a blog demo.
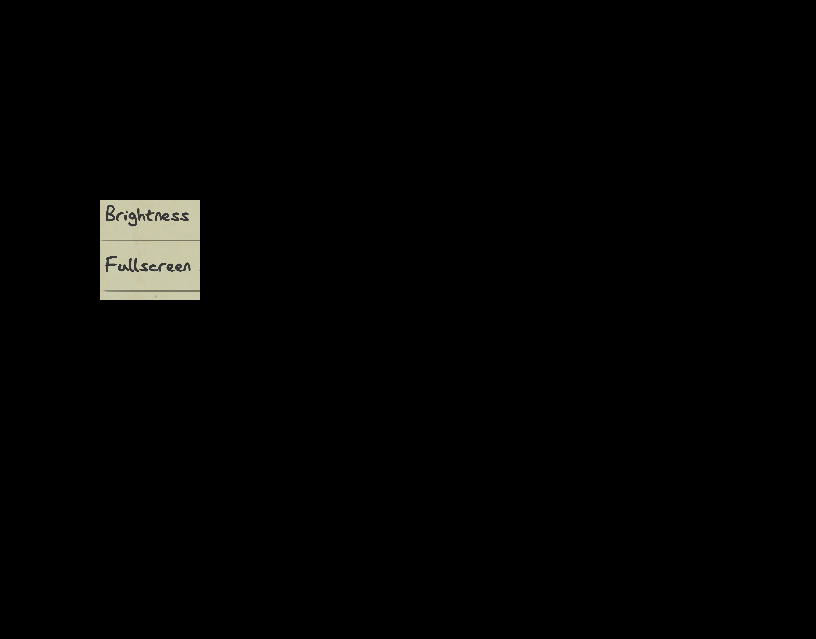
Here’s how this is useful – let’s say we’re on this screen – how do we recognize that? We could look at the image as a whole, but some portions may change. The portion that says “Brightness” and “Fullscreen” should stay the same, however.
What portion of the screen contains “Brightness” and “Fullscreen”? Using the guidelines we can estimate it as the 1st to 2nd red line horizontally and 2nd to 3rd red line vertically. We know our red lines are on the hundreds marks, so the box is (100, 200) to (200, 300).
def create_mask(shape, bbox):
    """Create a mask in the region of the box p1 to p2.

    A mask is a black image with a white rectangle inside.
    The black represents excluded area, while the white represents included.
    """
    mask = np.zeros(shape, dtype='uint8')
    # In the 2d slice by row and column, fill as white.
    p1, p2 = bbox
    mask[
        p1[1]:p2[1],
        p1[0]:p2[0],
        :] = (0xff, 0xff, 0xff)
    return mask

def demo_mask(img, bbox):
    _demo_mask = create_mask(img.shape, bbox)
    show_image(_demo_mask)
    show_image(img & _demo_mask)

demo_mask(fast_screenshot_window(), ((100, 200), (200, 300)))

Let’s start our automation loop with the Singleplayer lobby screen.
We actually visit this screen in a few different situations:
- Just finished a mission. Need to select a map.
- Just selected a map. Need to click “Ready Up”.
- Just clicked “Ready Up”. Need to click “Start”.
Let’s start with the first case. How do we know when we’re here?
One good way to tell would be that “Ready Up” is not enabled!
w.activate()
SINGLEPLAYER_LOBBY_SCREEN_NEED_MAP = fast_screenshot_window()
SHAPE = SINGLEPLAYER_LOBBY_SCREEN_NEED_MAP.shape # This won't change later.
show_image(debug_image(SINGLEPLAYER_LOBBY_SCREEN_NEED_MAP))
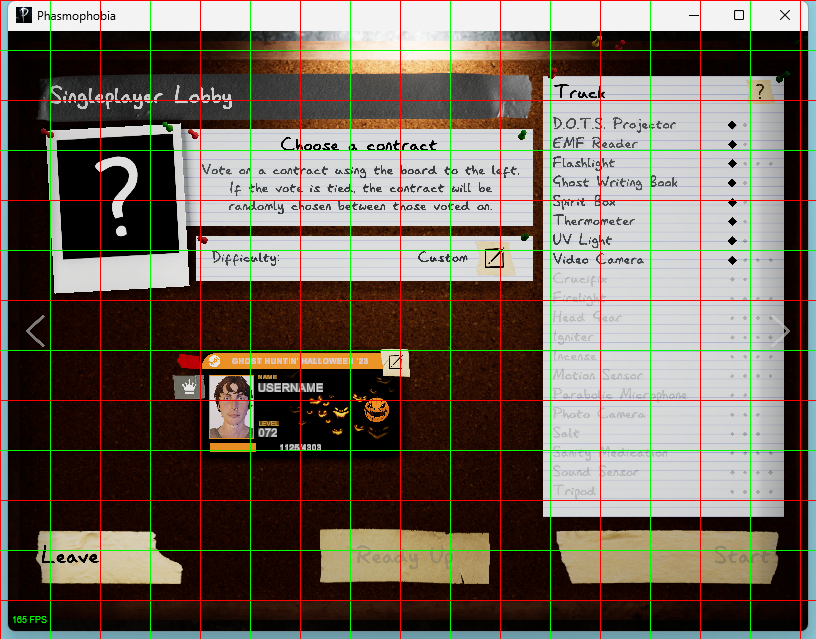
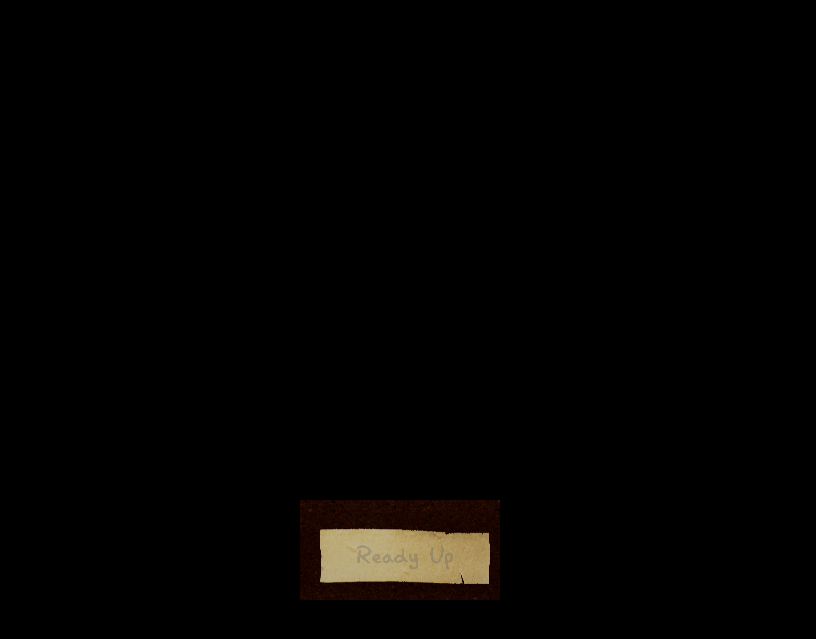
SINGLEPLAYER_LOBBY_SCREEN_NEED_MAP_MASK = create_mask(SHAPE, ((300, 500), (500, 600)))
show_image(SINGLEPLAYER_LOBBY_SCREEN_NEED_MAP & SINGLEPLAYER_LOBBY_SCREEN_NEED_MAP_MASK)
def images_same(img1, img2, mask, debug=False):
    """Is img1 equivalent to img2 over the masked region?"""
    img_diff = cv2.absdiff(img1, img2) & mask
    difference = np.sum(img_diff)
    if debug:
        print(difference)
        show_image(img_diff)
    return difference == 0

# Commented out because I had to wait a while to time it :)
# second_need_map = fast_screenshot_window()
print(images_same(
    second_need_map,
    SINGLEPLAYER_LOBBY_SCREEN_NEED_MAP,
    SINGLEPLAYER_LOBBY_SCREEN_NEED_MAP_MASK,
    debug=True))
628

False
Great! Except the function says the two screenshots are not equal!? The diff image shows the pixels where the two images differ. There’s one little dot where they’re different – because of a little dust particles that randomly floated into the second image!
Let’s add a fuzzy check with some tolerance for difference. It is worth also considering different ways we can alleviate the flakiness (literally!):
- Include more screen area in the comparison
- lowers the % impact of dust
- increases the odds of having dust in the masked region
- we need to be careful not to accidentally include stuff that changes, like XP level.
- Blur the image, so the error from dust is spread around impacting a larger area but for less
- Increase the per-pixel sensitivity, loosen the final diff check.
- Decrease the per-pixel sensitivity, tighten the final diff check.
These are just some general ideas, I’ll leave tradeoffs and implementation as an exercise for the reader, just demonstrating a basic approach.
def images_same(img1: np.ndarray, img2: np.ndarray, mask: np.ndarray, debug=False):
    img_diff = cv2.absdiff(img1, img2) & mask
    if debug:
        show_image(img1)
        show_image(img2)
        print(img1.dtype)
        print(img2.dtype)
        show_image(img_diff)
    # threshold: mark pixel as COMPLETELY different if it's at least different by 10.
    # This changes our difference measure from being the amount of difference to the
    # amount of pixels that are different beyond a specified margin.
    img_diff = cv2.threshold(img_diff, 10, 255, cv2.THRESH_BINARY)[1]
    difference = np.sum(img_diff) / np.sum(mask)
    if debug:
        print(difference)
        show_image(img_diff)
    # Allow 1% of the pixels to be different.
    return difference < 0.01
# same second_need_map from earlier
print(images_same(
    second_need_map,
    SINGLEPLAYER_LOBBY_SCREEN_NEED_MAP,
    SINGLEPLAYER_LOBBY_SCREEN_NEED_MAP_MASK,
    debug=True))
6.666666666666667e-05

True
The Scaffolding #
Navigating the menu screens is as simple as identifying our current menu and knowing the action to take from there.
Below is a fluent-ish system to register and perform “state-action” pairings. We’ll register the name of the state for debugging, the “golden” reference image for the menu screen, the mask for the region of the screen to focus on, and a callback performing action to progress past this menu.
_STATE_ACTIONS = {}

def when_state(state, golden, mask, action_callback):
    _STATE_ACTIONS[state] = (state, golden, mask, action_callback)

def then_do_key(key):
    return lambda: ahk.send_input(key)

def then_click_at(x, y):
    return lambda: ahk.click(x, y)

def step_state(debug=False):
    w.activate()
    current_screen = fast_screenshot_window()
    for state, golden, mask, action_callback in _STATE_ACTIONS.values():
        if images_same(current_screen, golden, mask, debug=debug):
            print('Matched', state)
            time.sleep(1)
            action_callback()
            return True
    return False
The Checklist #
There are a few steps we need to take to get into the game:
- Press the left arrow key to navigate to the map selection screen
- Click on a map to play in
- Press the right arrow key to navigate back
- Click “Ready Up”
- Click “Start”
I’ll demonstrate one more, as the rest follow the same general form.
when_state(
    'Singleplayer Lobby -- Need Map',
    SINGLEPLAYER_LOBBY_SCREEN_NEED_MAP,
    SINGLEPLAYER_LOBBY_SCREEN_NEED_MAP_MASK,
    then_do_key('{LEFT}'))

with display_recording():
    step_state()
Matched Singleplayer Lobby -- Need Map

We have automated detection of the lobby screen and taking action to advance!
Now let’s pick a map. We will have to click on a map to select it. When we vote on a map, a little red sticker will be placed to indicate that the map has been selected. To ensure we properly detect the difference between the “no map selected” and “map has been selected” states, keep the mask small so the sticker has a large impact on the image.
w.activate()
VOTE_CONTRACT_NEED_MAP = fast_screenshot_window()
show_image(debug_image(VOTE_CONTRACT_NEED_MAP))
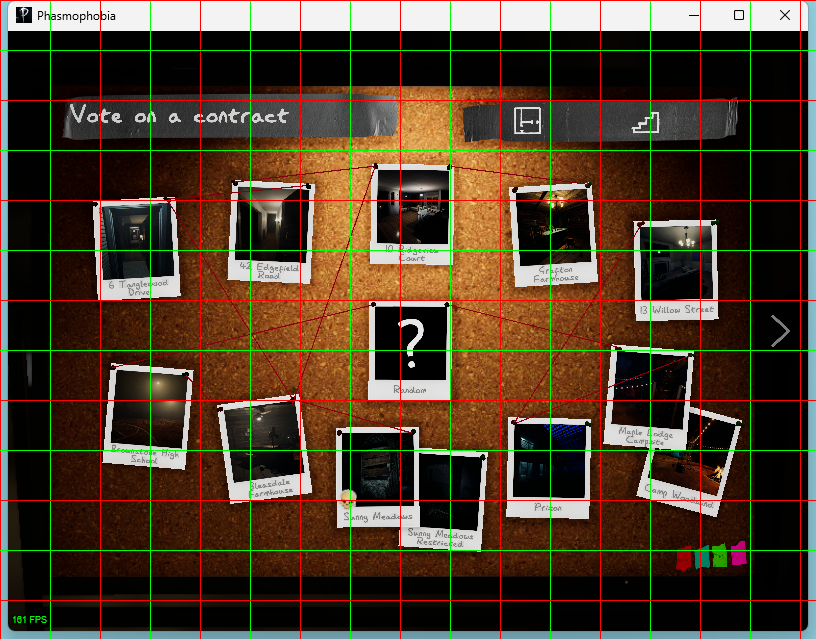
VOTE_CONTRACT_NEED_MAP_MASK = create_mask(SHAPE, ((100, 350), (150, 400)))
show_image(VOTE_CONTRACT_NEED_MAP & VOTE_CONTRACT_NEED_MAP_MASK)

when_state(
    'Vote Contract -- Need Map',
    VOTE_CONTRACT_NEED_MAP,
    VOTE_CONTRACT_NEED_MAP_MASK,
    then_click_at(150, 400))

with display_recording():
    step_state()
Matched Vote Contract -- Need Map

The End? #
We have registered two different states and what action should be taken. Now, we
can just keep calling step_state() in a loop!
Congratulations! You now have all the tools you need to automate all of the menu screens in Phasmophobia!
Next up: Automating the first-person “in-game” sections!
with display_recording():
    while step_state():
        # Always wait for animations after stepping state.
        time.sleep(1)
Matched Singleplayer Lobby -- Need Map
Matched Vote Contract -- Need Map
